The work with Terraform code may become tangled sometimes. Here are some guides on how to streamline it and make it transparent for you and your team.
It is extremely helpful in a team, and can benefit you even if you work individually. A good workflow enables you to streamline a process, organize it, and make it less error-prone.
This article summaries several approaches when working with Terraform, both individually and in a team. I tried to gather the most common ones, but you might also want to develop your own.
The common requirement for all of them is a version control system (such as Git). This is how you ensure nothing is lost and all your code changes are properly versioned tracked.
Basic Concepts
Let’s define the basic actions first.
All described workflows are built on top of three key steps: Write, Plan, and Apply. Nevertheless, their details and actions vary between workflows.

Basic 3-steps Terraform workflow
Write – this is where you make changes to the code.
Plan – this is where you review changes and decide whether to accept them.
Apply – this is where you accept changes and apply them against real infrastructure.
It’s a simple idea with a variety of possible implementations.
Core individual workflow
This is the most simple workflow if you work alone on a relatively small TF project. This workflow suits both local and remote backends well.

Git-based Terraform workflow
Write
You clone the remote code repo or pull the latest changes, edit the configuration code, then run the terraform validate and terraform fmt commands to make sure your code works well.
Plan
This is where you run the terraform plan command to make sure that your changes do what you need. This is a good time to commit your code changes changes (or you can do it in the next step).
Apply
This is when you run terraform apply and introduce the changes to real infrastructure objects. Also, this is when you push committed changes to the remote repository.
Core team workflow
This workflow is good for when you work with configuration code in a team and want to use feature branches to manage the changes accurately.
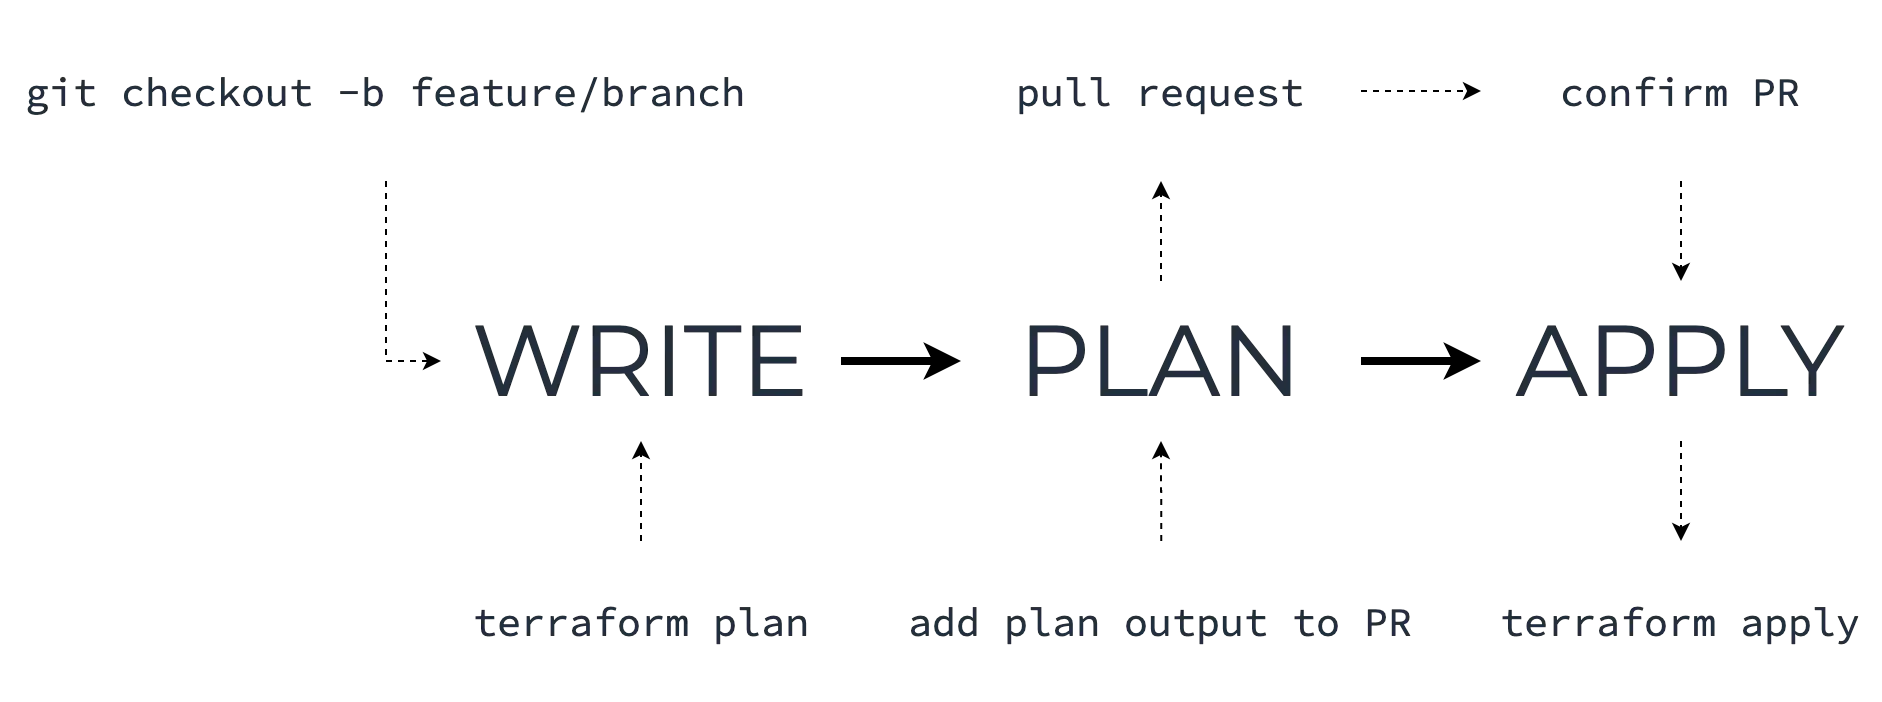
Git-based Terraform workflow in a team
Write
Start by checking out a new branch, make your changes, and run the terraform validate and terraform fmt commands to make sure your code works well.
Running terraform plan at this step will help ensure that you’ll get what you expect.
Plan
This is where code and plan reviews happen.
Add the output of the terraform plan command to the Pull Request with your changes. It would be a good idea to add only the changed parts of the common output, which is the part that starts with “Terraform will perform the following actions” string.
Apply
Once the PR is reviewed and merged to the upstream branch, it is safe to finally pull the upstream branch locally and apply the configuration with terraform apply.
Team workflow with automation
In a nutshell, this workflow allows you to introduce a kind of smoke test for your infrastructure code (using plan) and also to automate the feedback in the CI process.
The automated part of this workflow consists of a speculative plan on commit and/or Pull Request (PR ), along with adding the output of plan to the comment of the PR. A speculative plan mean just to show the changes, and not apply them afterward.
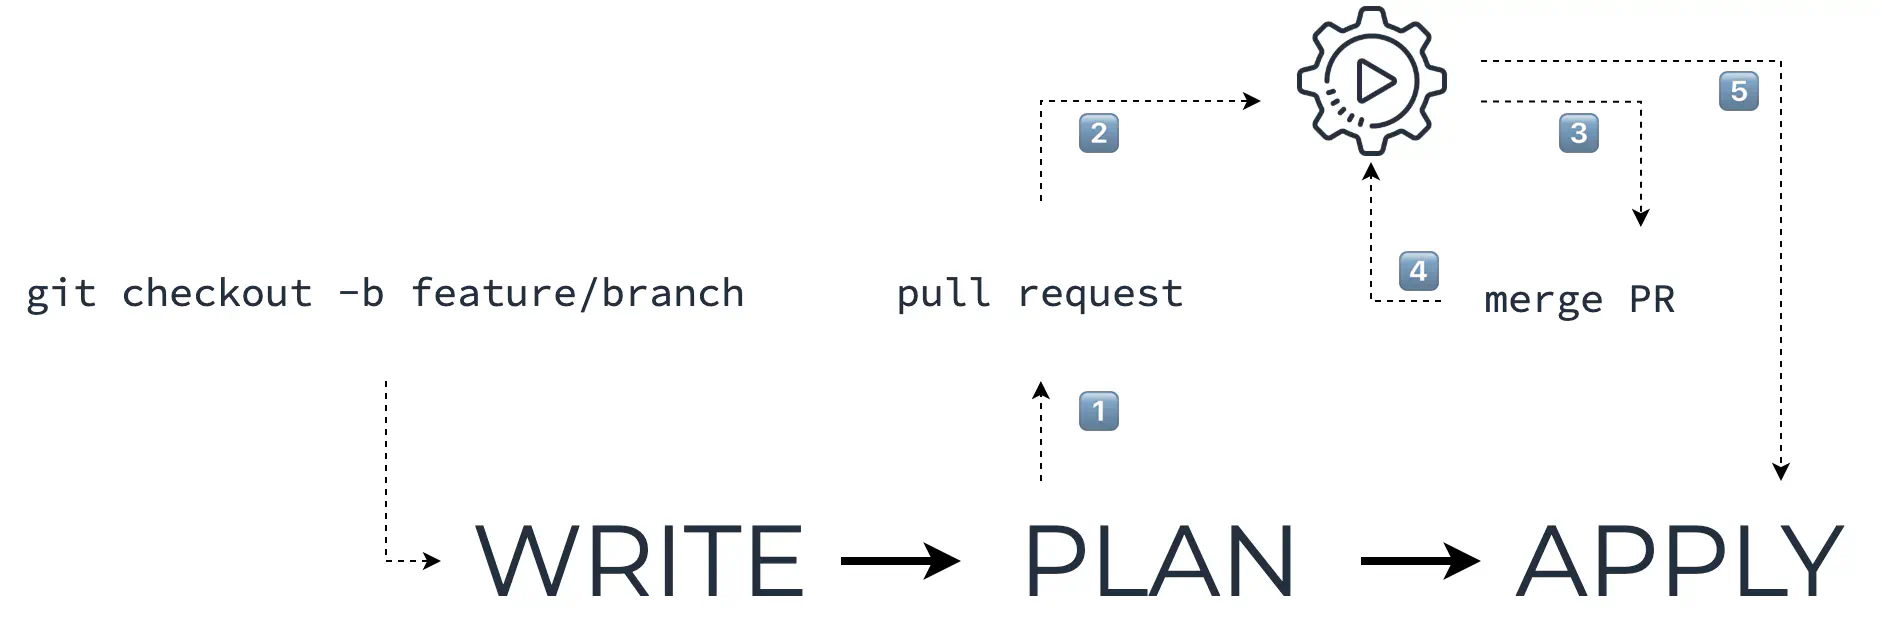
Git-based Terraform workflow with automation
Write
This step is the same as in the previous workflow.
Plan
This is where your CI tool does its job.
Let’s review this step by step:
1️⃣ You create a PR with the code changes you wish to implement.
2️⃣ The CI pipeline is triggered by an event from your code repository (such as webhook push) and it runs a speculative plan against your code.
3️⃣ The list of changes (a so-called “plan diff”) is added to PR for review by the CI.
4️⃣ Once merged, the CI pipeline runs again and you get the final plan that’s ready to be applied to the infrastructure.
Apply
Now that you have a branch (i.e. main) with the fresh code to apply, you need to pull it locally and run terraform apply.
You can also add the automated apply here – step 5 in the picture below. This may be very useful for disposable environments such as testing, staging, development, and so on.
The exact CI tool to be used here is up to you: Jenkins, GitHub Actions, and Travis CI all work well.
An important thing to note is that the CI pipeline must be configured in a bi-directional way with your repository to get the code from it and report back with comments to PR.
As an option, you may consider using Terraform Cloud which has a lot of functionality, including the above mentioned repo integration, even with the free subscription.
If you have never worked with Terraform Cloud before and want to advice to get started, I’ll provide the links at the end of this article.
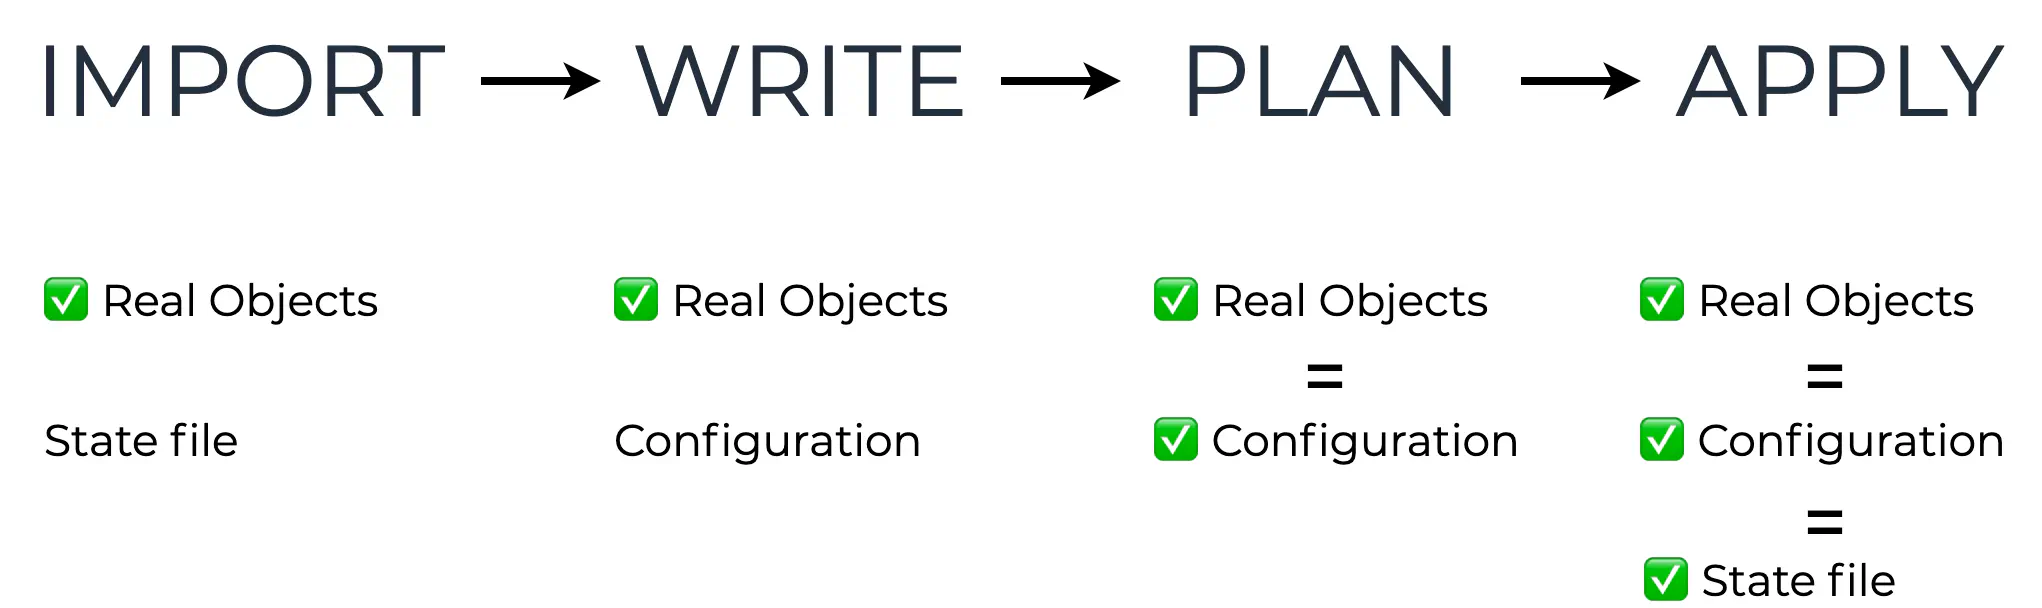
Import workflow
This workflow refers to a situation when you have some objects already created (i.e., up and running), and you need to manage them with Terraform.
Suppose we already have an S3 bucket in AWS called “someassetsbucket” and we want to include it into our configuration code.
Terraform resource import workflow
Prepare
You should create a resource block to be used later for the real object you’re going to import.
You don’t need to fill the arguments in it at the start, so it may be just a blank resource block, for example:
resource "aws_s3_bucket" "someassetsbucket" {

}
Import
Now you need to import the information about the real object into your existing Terraform state file.
This can be done with the terraform import command, for example:
terraform import aws_s3_bucket.assets "someassetsbucket"
Be sure to also check the list of possible options import accepts with terraform import -h
Write
Now you need to write the corresponding Terraform code for this bucket.
To avoid modifying your real object on the terraform apply action, you should specify all needed arguments with the exact values from the import phase.
You can see the details by running the terraform state show command, for example:
terraform state show aws_s3_bucket.assets
The output of this command will be very similar to the configuration code. But it contains both arguments and attributes of the resource, so you need to clean it up before applying it.
You can use one of the following tactics:
- either copy/paste it, and then run
terraform validateandterraform planseveral times to make sure there are no errors like “argument is not expected here” or “this field cannot be set” - or you can pick and write only the necessary arguments
In any case, be sure to refer to the documentation of the resource during this process.
Plan
The goal is to have a terraform plan output showing “~ update in-place” changes only.
However, it is not always clear whether the real object will be modified or only the state file will be updated. This is why you should understand how a real object works and know its life cycle to make sure it is safe to apply the plan.
Apply
This is usual the terraform apply action.
Once applied, your configuration and state file will correspond to the real object configuration.
Wrapping up
Here is an overview of Terraform Cloud for those who never worked with it before: Overview of Terraform Cloud Features
And here is a nice tutorial to start with: Get Started - Terraform Cloud
Also, here is an overview of workflows at scale from the HashiCorp CTO which might be useful for more experienced Terraform users: Terraform Workflow Best Practices at Scale
Thank you for reading. I hope you will try one of these workflows, or develop your own!